Showing posts with label sewing lessons. Show all posts

Sunday, August 14, 2011

How to Sew a Tiny Rolled Hem

This hem is best for evening and bridal wear, prom dresses, etc. 
Also great for chiffon, charmeuse, any slippery, or whispy type fabrics.

You will be sewing around your hem 3 times, but only 1 stitch line will be showing.


First, mark your hem.
Cut your fabric 1/2 inch below where you want the finished hem to be.

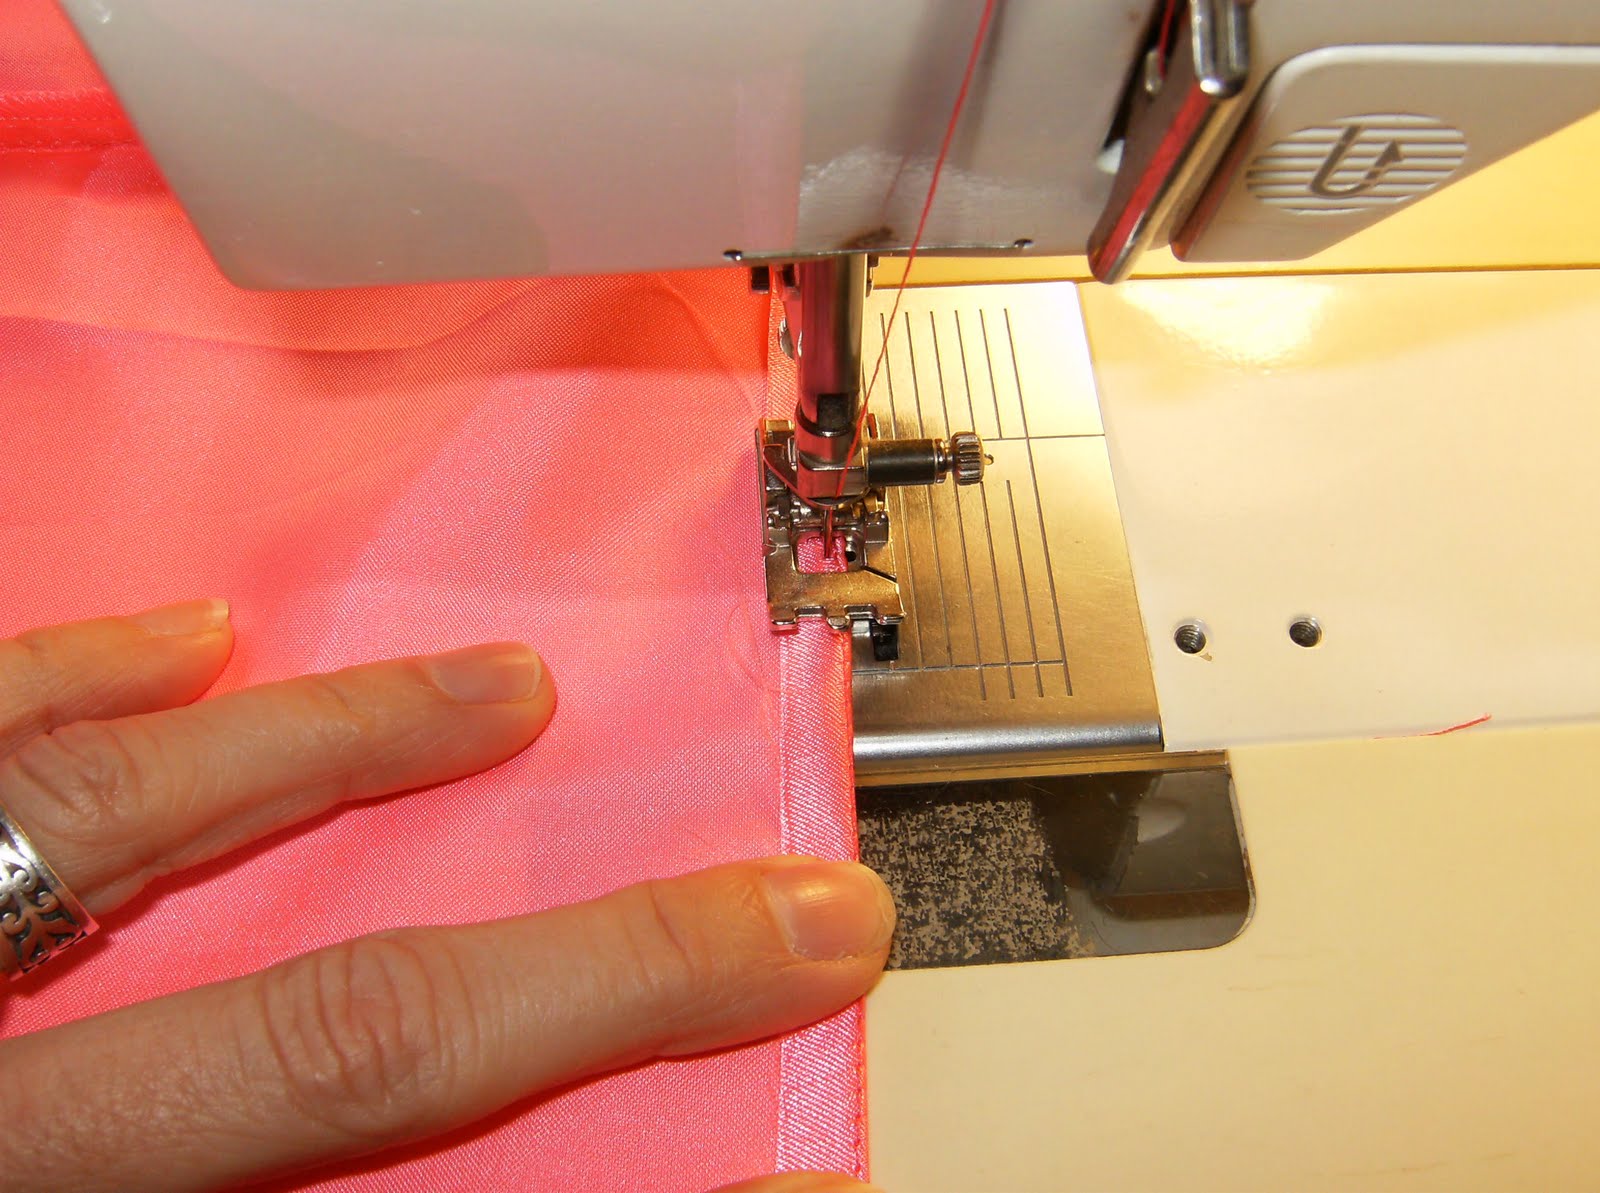
Now you should start sewing (with a normal straight stitch).  You can see that I have the cut edge of my fabric on the 3/8" line on my throat plate (the little silver plate underneath the presser foot).


That's your 1st hem.
It should look like this...


Now you will want to fold your fabric to the left, directly on that stitch line.  This gives you a perfect 3/8" seam allowance for the hem.  Next, stitch very close to the fold. About 1/8" or less.

This is your 2nd hem.


Next you should trim away the excess hem fabric.  Cut as close as possible to the second hem-line.  You need a good pair of sharp scissors for this.  I like to use my small embroidery scissors.


A closer look.


Now roll the hem to the left again, and stitch as closely as possible to the left edge of the hem.  This is your 3rd and final hem.


Press and you are done!


I know... it's been forever since I've posted anything about sewing... Right?

Have a Lovely Sunday!


Monday, March 14, 2011

Pillowcase Dresses

How to Make One ~

This one is made entirely from remnants,
so think of it as "Zero cost!"

Start with a piece of fabric measuring 14 x 28 inches.


This piece is a little short, measuring only 10.5 x 28".
It's easy to make up that difference by using more remnants to add to the hem..
Here, I decided to add a 2" strip of yellow fabric, folded in half lengthwise, layered on top of a 3" strip of red fabric, which I hemmed and gathered.


Next, cut out the openings for the arms.
Fold your main piece of fabric in half, then fold in half again,
like this...


You can see the 4 layers of fabric above. 
Cut out a small section measuring 1.5 x 3 inches,
in the shape of a "J", like in the next photo.


Now when you unfold your fabric, it should look like this...


For the shoulder strap, I'm using red fabric measuring 3 x 36".
For the arm hole binding, my yellow fabric measures 1.25 x 10".


Next, I've attached the ruffled section to the main section of fabric.


For the arm openings:
Lay the binding strip face down on the inside of the dress,
so that the right side of the facing is against the wrong side of
the dress.  Stitch using a 1/4" seam.


I find it's easier to do this freehand (no pins).


The easiest way to work around the curved area, is to keep
the binding strip straight, and to gently pull the curved section of
the main fabric to the left, so that the cut edges are even.  Sew
just a few stitches at a time, then re-adjust your fabric.
That may sound confusing, but it's really easy.  The photo
above should make it easier to understand.


Once you've done that, lay your piece right side up,


just use your fingers to fold your binding like the following
photo... You have a 1/4 inch seam allowance, now
fold 1/4 inch from the raw edge toward the seam allowance.


Then fold it over again, and you have a nice 1/4" binding
for the arm opening. 


Topstitch just along the folded edge.


Next, stitch the center back seam.


Fold over 3/4 inch hem along the top,  front and back.
Next,
Using a 1/4" seam allowance, sew your piece for the
shoulder strap, turn inside out and press.


Pull the strap through the top casing, and you are done!


How cute is that??
And made entirely from remnants!
In total using less than 1/2 yard of fabric.


Once I got started, it was hard to stop...


My sister has 2 grand-daughters under the age of one,
and another due in 6 weeks, so these will  come in handy.

And if I do say so myself...


I think this is the cutest way ever to use up all of those
little scraps of fabric and trim.


Six dresses in two days, and I think I may be everyone's
favorite Auntie after this.

Now I have to get some real work done...

Have a Lovely Day!!

Edited to add adjusted measurements for other sizes ~
For the main fabric piece (body of the dress)
Up to 6 months - 14 x 28"
12 months - 16 x 30"
18 months - 17 x 32"
2T - 18 x 33"
3T - 19 x 34"
4T - 20 x 35"

Wednesday, January 19, 2011

Upholstery Class ~ Part 5

Flossie Gets A Skirt ~

Ready class?


Now I will add the banding to the lower edge of the chair.  I like to begin and end the banding near the center back of the chair.  I'm going to place the flange of the cording so that lines up perfectly with the very bottom of the wood frame.  You want the cording to be snug, so pull it nice and tight as you staple every few inches, making your way around the chair.


Now you will want to measure from the seam line on your cording to the floor.  It's important to measure all the way around the chair this way.   The measurement across the front of the chair will be the same, of course, but sometimes the sides of the frame are angled slightly downward.  You can see in the photo that this particular chair frame is 11 inches from the floor at the front edge of the chair.  The back of the chair was only 10 inches from the floor.  So keep that in mind, and check your measurements.

Oh... one more thing...
Any excess fabric that is showing below the cording,
(like in the pic up there) can be trimmed away now, or stapled underneath the chair.

Now let's get a look at that skirt...


You could go with a smooth skirt, with no pleats....
But I think Flossie wants to kick up her heels a bit,
so pleats, it is!

The skirt is applied in sections,
1st - front
2nd - sides
3rd - back
The last thing you apply, are the corners.

8 separate pieces.
Don't let that scare you.
You can do this.

I like to use a nice wide hem, like this....


Temporarily pin your pleats in place, beginning and ending at each corner.  Then secure by adding tack strip and tacks.  But don't tack down the corners just yet.


Hopefully you can see in this next photo...
I have secured the front and side sections, which I've pinned up out of the way.
Each corner will be finished with a section of skirt about 8 inches wide.  You can see that it's folded down in this photo.

I fold it up out of the way with the rest of the skirt, and then tack the corners down.


The last thing you should do, is to add 1 more piece of fabric to the very bottom of the chair, to cover up those burlap straps.

Step back and admire your hard work...

You are done!!!


A star is born!!
Ain't she sweet?

I hope I've encouraged some of you to give it a go. 
Remember how Flossie began?


Find an old chair and give it a new life.  If you need any help, just let me know.  And I want to see some before and after pics....

Otay?

Tuesday, January 18, 2011

Upholstery Class ~ Part 4

Good Morning Class!

Today we will cover Flossie's Bottom.


Use your foam as your pattern.  Lay your foam on the wrong side of your fabric, and trace around it, adding 1/2 inch all the way around for a seam allowance.

The first thing you need to do is to sew the cording around both pieces of the seat pattern.  Clip the cording to ease around curves.  Like this....


Now we can add the banding.


You should clip your curves after you've added your banding.

This next photo isn't the best, so I'll try to explain in great detail...
  This little trick will help you to match all of those corners and curves on the top and bottom pieces.
\
Take the piece that you've added the banding to, and place it on top of your foam, right side up.  Fold the banding down over the sides, so it will be out of the way for the moment.  It should look almost like the finished product at this point.  Place the bottom piece, right side down, over the top piece, matching all of the corners and curves. 


I temporarily pinned my pieces together.


When I pull the banding strip back up, you see that  makes it much easier to match all of the corners and curves.  Pin the banding to this side of the cushion  now.


See how nicely those corners and curves match up? 


Remember to leave an opening to insert your cushion.
Stitch it up, clip your curves and corners.

This is not necessary, but I like fat cushions.
I add several layers of batting, so the corners are more rounded.


Now this next little tip isn't necessary, but is something I like to do.  If you have ever tried to wrestle a fat piece of foam into a cover... you'll appreciate this.

Before I insert the foam, I like to cover the foam with another piece of fabric. 
Use an old sheet if you want to. Just hand baste it all the way around.  Your stitching here doesn't have to be perfect, no one is going to see this.

Think of it like this....
You know how, when you wear a slip, your dress just slides on effortlessly?  This is flossie's slip.  You will thank me for this later on.


Now you can insert the cushion and stitch her up!


A curved needle makes this SO much easier. 
Again, use long stitches.  About 1/2 inch long stitch in the cording fabric, and then 1/2 inch long stitch in the banding fabric.


YEEE HAW !!
Flossie's lookin' good!

We'll have to do the skirt tomorrow class.
Teacher's dryer kicked the bucket - gotta deal with that.

Any questions?