A tutorial.
Yes you can just glue fabric over the existing fabric or paper.
But if you want a professional looking lampshade, I recommend
removing the old fabric or paper, so you're left with just the frame.
I think most of you know how to trace a pattern around a shade,
so I won't bore you with that.
I made this with 2 pieces of fabric, and stitched the seams together,
and took up the seams until the fabric fit nice and snug around the
frame. Pull it down nice and tight, pin in place, and hot glue
the fabric to the top and bottom of the frame. Trim away the
excess fabric.
Now for the fun part.
Many fabrics, like this one, make it so easy to see where to
add your beads. Think of it like coloring books ~ the outline
is there. You just fill it in how ever you like.
One little trick ~ after every 2 or 3 beads that you sew on,
tie a knot.
way you like it, move on to the beaded fringe.
Yes, you can just go and buy it.
But I prefer to make it. And it's really easy.
If you make it yourself, you get exactly what you want.
a piece of seam binding to length. I use low tack tape to secure
it to my ruler. At half inch intervals, string up your beads.
Make sure you don't pull your string too tightly. Your seam
binding should lay nice and flat. Tie a knot after each section of beads.
Now for your fabric lining:
You can use the old lining from your lampshade to make a pattern.
Again, I used 2 pieces of fabric, stitched together on the sides.
I used acetate rayon for the lining. The same fabric you would
You can use the old lining from your lampshade to make a pattern.
Again, I used 2 pieces of fabric, stitched together on the sides.
I used acetate rayon for the lining. The same fabric you would
use to line your garments.

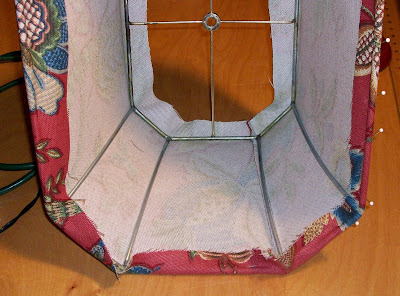
Pull it nice and snug, and pin in place.
You'll have to cut a little slit for the braces.
We'll cover the slit in the next step.

Here, you'll want to use double stick tape instead of hot glue.
Hot glue has a tendency to dry with hard lumps and bumps,
so that won't work here. With the double stick tape, you get
a nice flat finish. You can get the double stick tape from your
fabric store.

Work in sections, from one brace to the next.
Apply your tape, close to the top, then peel off the paper.
Pull your lining over the top, nice and snug, and press it
into the tape. Work it in there good.

Trim away the excess fabric, close to the tape.
Like you see on the right side of the above photo.
Now add about a one inch section of double stick tape
over each of the areas where the lining was split.
Outside each brace.

Cut a bias strip of the lining,
about 2 inches wide and 10 inches long.
Fold and press it, so that you have a double fold,
like the next photo.

Pass the folded piece underneath the brace, ...

... fold it over, to the outside of the lampframe.

Press this into the double stick tape, and trim close.
Repeat for remaining braces.

Now, cut a 1 and 1/2 inch bias strip of your cover fabric, long
enough to go around the top of your lampshade, plus a few
inches. Fold over each side of bias strip, and press it with a
hot iron. I used the double stick tape here again, on the inside
of my bias strip folds, to keep it nice and flat.
Once you've done that, apply the double stick tape to the
wrong side of your bias strip. I used 2 strips of tape here.
Remove the paper backing, and press firmly along the top
of your lampshade.
Like so...

Using the tape again, fold over one end, to cover the cut end
of your bias strip.

You can apply your beaded fringe with tape or glue to the
inside, lower edge of your shade.
Then, pull the lower edge of your lining nice and tight,
and pin in place. You'll want to hand stitch the lining to
the lower edge.
Like so...

And there you have it!

I love to inspire and encourage others.
I'm not a teacher, but if I can encourage any of you to get your craft on,
well... that just makes me happy!
I only spent about $20 on beads for this shade.
I hope this has inspired some of you, to make a lampshade to
perfectly match your decor.
If so, let me know. I love hearing from all of you, my girlfriends.


Oh Teresa, I could never make this! It's beautiful, loved seeing the step by step.
ReplyDeleteOh wow -- so beautiful! I wonder if I have a shade around to play with and give it a try sometime.
ReplyDeleteJanet
Such talent, you ARE amazing!
ReplyDeleteMy mouth is still wide open! That little project would have taken me a solid week! You are amazing! I LOVED your photo step by step instructions!
ReplyDeleteMalisa
Beautiful. You make it look so easy! I have never attempted a lampshade - - it seems to scary! Your's on the other hand is fabulously adorable, makes me want to try my hand at it.
ReplyDeleteI arrived at your blog via The Lettered Cottage, and I'm so glad I did! This tutorial was amazing. If I didn't already have so many projects in the works, I'd rush out TODAY and get the supplies to make my own lampshade. What wonderful, clear instructions. I'll definiely be bookmarking this for future reference!
ReplyDelete